TRITON-D10™ is an automotive and motorcycle diagnostic scanner and multimeter scope tool with sophisticated functionality, advanced graphing features, an intuitive user interface and user-customizable configuration.
Click on an image to expand, click again to reset size. Try it on the image above! Does not apply to all images/illustrations.
Use your browser BACK button to view the last page you visited . For more information on how to use this application, see About Help.
Only use the manufacturer recommended battery pack.
| 1. | Loosen the battery cover screw on the back-side of the diagnostic tool. |
| 2. | Pull up and out on the lower edge of the battery cover to release it. |
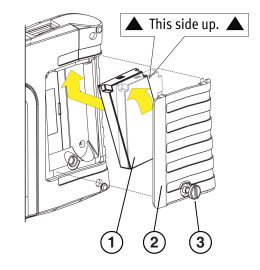
| 3. | Position the battery pack (packed separately in kit box) as shown below with the arrows facing up. |
| 4. | Tilt the top of the battery in to align the tabs, then down to install into place. |
| 5. | Install the battery pack cover, in the opposite manner as removal, aligning the tabs and tilting down and in, into place. |
| 6. | Tighten the battery cover screw. Do not overtighten the screw! |
| 1. | Battery Pack |
| 2. | Cover |
| 3. | Cover Screw |
Watch the beginning of this video for typical battery installation instructions. Opens in a new tab.
Diagnostic training videos are intended as a guide only. Some content and/or platform features shown may not be applicable for your market.
To TURN ON the diagnostic tool, press and release the Power button  .
.
The tool will automatically turn on when either of the following occur:
| ● | a live AC power supply is connected to the tool |
Never connect the AC power supply adapter, or optional power cable to the diagnostic tool when communicating with a vehicle.
| ● | the Data Cable is connected to a powered vehicle data link connector (DLC) |
An optional power cable is required when testing non-OBD-II/EOBD vehicles or vehicles that do not supply power on the DLC.
Power may be supplied by any one of the following:
| ● | Charged internal battery pack |
| ● | Live AC power supply (charging internal battery) |
| ● | The vehicle data link connector (DLC) (diagnostic tool data cable connected) |
To TURN OFF the diagnostic tool:
| 1. | Exit all functions and communication with the vehicle. |
| 2. | Follow all screen prompts, to exit functions. |
| 3. | Press and release the Power button. |
All vehicle communication must be stopped BEFORE turning off the diagnostic tool. Never disconnect the Data Cable when the diagnostic tool is communicating with the vehicle.
For more information, see Wi-Fi Connection Help (new tab)
The Snap-on Technician Profile is where you manage all your companion Snap-on application accounts (e.g. Security Link, and Snap-on Cloud).
Before you can use any of the companion Snap-on applications, you need to create a Snap-on Technician Profile and link your diagnostic tool to it.
To learn more, see Snap-on Technician Profile (new tab).
For your safety and the safety of others, before you operate this device read and understand the Important Safety Information.


